Send the same 2D drawing to two different factories, and you will get two entirely different Compact Powder Cases. One opens smoothly with a distortion-free mirror. The other rattles, wobbles, and distorts your reflection. What makes the difference? It is not luck. It comes down to six engineering details across the mirror, hinge, and clasp that were left off the drawing. When a supplier tells you “they are all the same,” these are the exact details they overlook.
After years of inspecting samples on the production line, we found that every client complaint about “poor hand feel” traces back to these six points. Subjective complaints like “feels too loose,” “feels too tight,” or “feels cheap” can all be translated into measurable specs on your drawing.
The tactile quality of a compact case depends on three areas: mirror clarity, hinge actuation, and clasp retention.
Why Do Compact Mirrors Rattle?
Detail 1: Mirror Clearance and Fit Tolerances
What your hands feel: Open and close the lid a few times, and the mirror clicks inside the cap. Push the edge with a fingernail, and you can feel it shift. Suppliers often say, “That is normal—assembly requires clearance.” That is only half true.
Root cause: You need assembly clearance between the mirror and the lid, but design drawings must define this gap, not the assembly worker. Excessive clearance lets the mirror float, causing audible rattling and a loose fit. Zero clearance might work for glass, but it bends plastic mirrors. You do not need lab tools to check clearance—your hands are enough. Open and close the lid five or six times. A clicking sound means the mirror is hitting the locating rib. Next, run a fingernail along all four edges while applying light pressure. If one edge moves, that is where the excess gap sits. Do not reject the sample immediately. Check whether the design left too much room or the assembly pressed it off-center. Uniform play on all four sides points to a drawing issue. Single-sided looseness means an assembly flaw. Fixing drawings requires recutting mold inserts, while fixing assembly means adjusting retaining ring pressure or adhesive dotting. One costs money; the other costs time.
Factories fix mirrors in three ways: optical-grade double-sided tape, mechanical snaps with a retaining ring, or overmolding the bezel. Double-sided tape requires specialized acrylic adhesive that will not attack the silver coating; standard tape degrades the coating over time, causing black edges. Double-sided tape also degrades in high heat and humidity. Mechanical rings must sit completely flush. Overmolding offers the most secure fit but requires high mold precision. Regardless of the method, run a cross-hatch adhesion test with 3M 600 tape. Demand Class 0 (ISO Class 0 / ASTM 5B), meaning zero flaking along cut edges. A detached mirror is a critical safety hazard, not just a cosmetic flaw.
Many factories have suffered from loose mirrors. While rework is costly, customer complaints about warped reflections do far more damage.
Detail 2: Preventing Plastic Mirror Distortion
What your eyes see: When a mirror shows a wavy or distorted reflection, it is not an optical illusion—the substrate has warped.
Root cause: Thin plastic mirrors made of PMMA (acrylic) or PC flex easily under mechanical stress. Uneven support ribs, excessive press-fit force, or ultrasonic welding vibrations through the lid will bend the sheet, warping the reflection. If the lid requires ultrasonic welding, always weld the shell first and install the plastic mirror afterward. Back-painted glass mirrors (~1.3 mm with a 3-layer structure) remain far more rigid and resist warping.
Premium lines stick to back-painted glass. Budget or travel-friendly lines use plastic mirrors because they cut weight in half and resist shattering. However, plastic requires flat, uniform backing support—any localized pressure causes distortion. Assembly cannot fix a poorly supported plastic mirror. To check for distortion without optical equipment, hold the mirror against a straight grid, doorframe, or window frame and pan slowly. If straight lines bend or ripple, the mirror is warped. Human faces mask distortion; straight lines expose it instantly.
Hinge Torque and Free-Stop Positioning
Detail 3: Hinge Torque Specs
What your hands feel: Premium compacts open smoothly with light thumb pressure and hold their position at any angle.
Root cause: The hinge rotation torque determines this tactile response. The standard actuation force range is 0.227 to 0.9 kgf. To measure torque, clamp a torque gauge to the edge of the lid and open it at a steady speed to record peak values. Test opening and closing 3 to 5 times each to get a stable average. Always test brand-new samples and aged samples after fatigue cycles. Testing only fresh samples proves nothing; hinges that lose torque after three months trigger returns. A range of 0.227 to 0.9 kgf means your thumb opens the lid effortlessly without accidental pop-ups. Below 0.227 kgf, the lid flops loosely; above 0.9 kgf, single-handed opening hurts your fingernails. Friction hinges (damping hinges) open up to 135°–180° and hold position anywhere between 45° and 135°. This free-stop action gives mid-to-high-end compacts their premium feel.
Manufacturers use three hinge types based on product tier:
- Integral PP living hinges: Molded as a thin web (0.25–0.5 mm) connecting base and lid. They offer the lowest cost for mass-market items but feel flexible and lack free-stop capability.
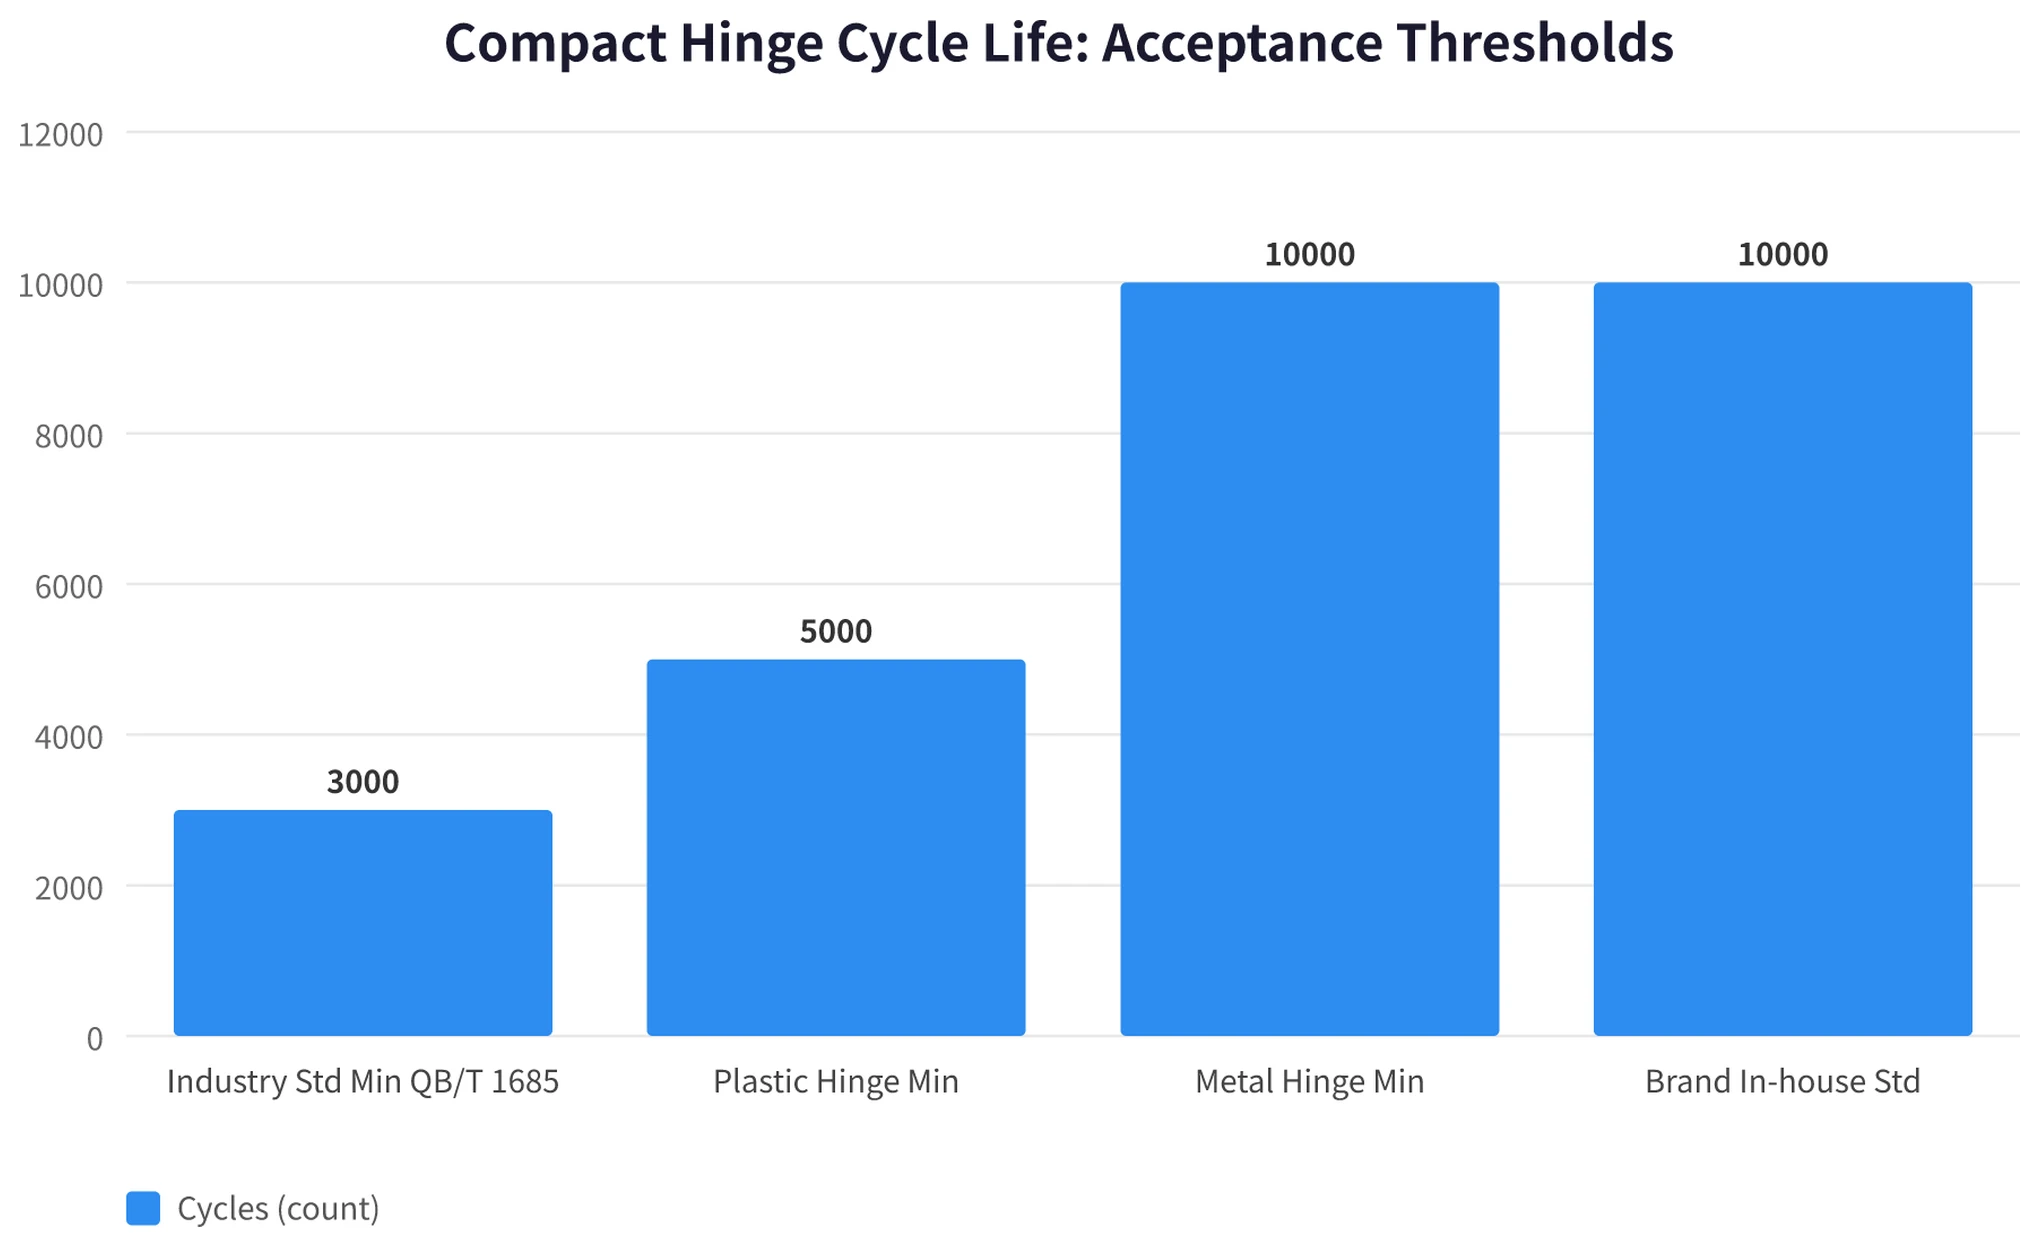
- Steel pin hinges: Provide durable, consistent movement rated for 3,000 to 5,000 cycles, with leading brands requiring over 10,000 cycles.
- Friction hinges: Deliver smooth, uniform resistance and hold the lid steady at any angle.
Define torque ranges and holding angles directly on the 2D drawing instead of writing vague terms like “smooth hand feel.”
While specific torque targets vary by brand positioning, they all aim for effortless opening and reliable holding. Benchmark competitor samples with actual gauge measurements rather than copying arbitrary numbers.
Detail 4: Torque Fatigue and Retention
What your hands feel: When a compact lid drops shut on its own after a few months, the hinge has suffered torque fatigue.
Root cause: Hinges are wear items that lose torque after thousands of cycles. While living hinges can theoretically flex a million times in ideal lab conditions, production standards require hard cycle limits: at least 5,000 cycles for plastic hinges and 10,000 cycles for metal pin assemblies. The 10,000-cycle threshold is significantly stricter than the generic industry baseline of 3,000–5,000 cycles.
High cycle counts mean nothing without measuring residual torque. Run the sample on an automated reciprocating tester at a fixed cycle rate, then measure torque again. Any unit falling outside the specification window fails. To stress-test hinges further, run thermal cycling in a temperature chamber before mechanical cycling. Summer heat inside cars and freezing winter shipping accelerate hinge fatigue; passing ambient-temperature tests does not guarantee all-weather reliability. Write explicit torque retention limits directly into your quality agreement.
On sample inspection benches, lids that cannot hold their angle remain one of the most common causes of batch rejections.
Clasp Fit, Retention, and Durability
Detail 5: Undercut Angle and Latching Force
What your hands feel: A clasp that breaks your nails or opens unintentionally inside a purse fails usability.
Root cause: Most clasp lugs (snap-fit catches) are molded directly into the compact housing. The mating angle of the retention face controls opening resistance. An angle below 90° slips open too easily. Exactly 90° risks root shear under sudden pull force. An undercut angle above 90° significantly increases retention force. Tactile feel comes from tuning this retention angle against the interference fit (the radial deflection during latching).
Because snap catches are molded undercuts, injection molds require lifters or side-action sliders. Achieving the exact retention force on the first tool trial (T1) is rare; toolmakers typically tune inserts across two or three trials. Variation during sampling is normal. What matters is disciplined verification: hook a digital force gauge to the lid lip and pull vertically to record peak release force. Comparing quantified data across revisions shows whether tool modifications worked. Repeated opening and closing causes plastic deformation and fatigue, gradually lowering release force. Record pull forces before and after endurance cycling to calculate clasp retention margin.
Detail 6: Stress Whitening and Squeaking
What your eyes and ears detect: Some clasps last years without issue, while others show white stress marks or emit sharp creaks after a few dozen cycles, instantly degrading perceived quality.
Root cause: Stress whitening on ABS catches occurs when local strain exceeds the material’s elastic limit. Beyond improper snap angles, excessive wall thickness and stiff resin grades contribute to this flaw. Once stress whitening appears, retention force drops and friction squeaks follow. To catch this during sample review, inspect the snap root under bright light, cycle the lid 30 to 50 times, and re-examine. Stress marks that emerge after brief cycling reveal an inadequate fatigue margin. Always inspect the root radius from an oblique angle under directional light, as stress lines hide when viewed straight-on.
Magnetic closures require separate validation. The industry standard magnetic pull force ranges from 2 N to 10 N. Around 2 N offers a light, effortless snap, while 10 N demands noticeable effort. Measure magnetic force by pulling vertically with a force gauge to record breakaway force. Magnets and mechanical clasps are not mutually exclusive; premium designs often combine both, using magnets for satisfying tactile closure and mechanical catches for travel security.
The 6-Step Tactile Bench Test for Samples
You can validate any compact sample on the bench in six steps:
- Actuation test: Push the lid open to evaluate initial opening resistance.
- Free-stop test: Release the lid at both 45° and 110°. If it holds firmly at both angles, torque distribution is balanced across the stroke.
- Mirror grid check: Pan the mirror across a straight door or window frame to check for optical distortion.
- Clearance check: Push the mirror edges with a fingernail to detect loose play or rattling.
- Stress inspection: Cycle the clasp 30 times, then check the snap root under oblique light for stress whitening and listen for creaking.
- Retention shake: Shake the closed case to confirm the clasp holds without internal rattling.
Standard quality control tools—torque meters, reciprocating cycle machines, and digital force gauges—handle all quantitative checks.
Specifying exact tactile parameters on your technical drawings eliminates ambiguity during incoming inspection. Writing “good hand feel” on a specification sheet gives your Cosmetic Packaging Manufacturer nothing measurable to execute or guarantee.
Dongguan Sambound New Material Technology Co., Ltd. specializes in precision mold manufacturing. If you need to benchmark compact samples or define measurable tactile criteria on your 2D drawings, send us your CAD files or physical samples. Sambound will review all six design parameters and deliver an actionable mold engineering solution.